3 Nutritious and Easy Vegie Lunches
Words / Pete Evans
I’m a beach boy gone country and, if I didn’t already love vegies enough before I started working the farm, I have a newfound appreciation after a few good seasons of growing our own.
As a chef, I like nothing more than using fresh, seasonal vegies, grown as close as possible to home — and nothing gets closer than your own backyard. On the journey of learning how to grow vegies that go plot to plate, I’ve found a few of my favourites each season that I’ve dubbed “very good” vegies. These are vegies that grow well with good soil, organic fertiliser, water and fresh air. In the kitchen, they are also easy to cook with, can be used in lots of recipes and hit it for six when it comes to nutrients and flavour. At the farm we have eight square vegie beds, which have some protection from the elements and are fed with their own rainwater tank. It means we’ve always got a supply of “very good” vegies on hand to cook with and I want to share some recipes inspired by what we’re growing in our patch this winter.
Vegie favourites
Anything fibrous, green and leafy that grows above the ground is a daily staple because these vegies are nutrient heavyweights. We eat lots of broccoli, cauliflower, cabbage and kale because they are fibrous cruciferous vegetables. What’s so special about this family of vegies is that studies have shown they may be capable of killing cancer cells.

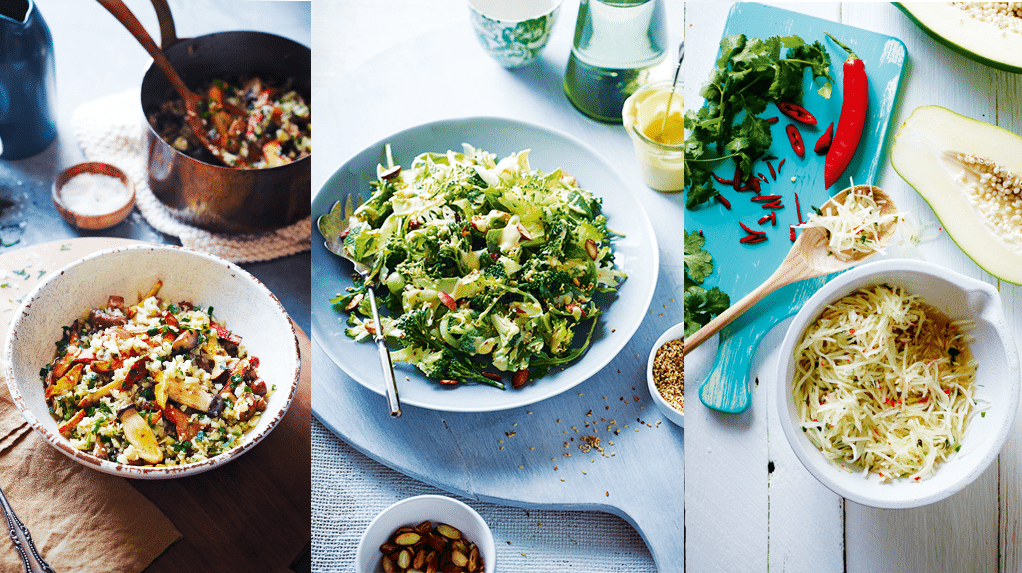
WILD MUSHROOM “RISOTTO” WITH CHESTNUTS &TRUFFLE OIL
Serves: 4
1 tbsp. dried porcini mushrooms
600g cauliflower, roughly chopped
3 tbsp. coconut oil or good-quality animal fat
150g king brown or oyster mushrooms, sliced
150g Swiss brown mushrooms, sliced
200g pine, slippery jack or Portobello mushrooms, sliced
Sea salt & freshly ground black pepper
1 onion, diced
4 garlic cloves, chopped
1 tsp finely chopped thyme
125mL (½ cup) dry white wine
300ml chicken bone broth or vegetable stock
2 tsp lemon juice
2 tbsp. finely chopped flat-leaf parsley leaves, plus extra to serve
4 peeled chestnuts, finely sliced & toasted
Truffle-infused olive oil or extra-virgin olive oil, to serve
Soak the porcini mushrooms in 100mL of water for 10 mins. Drain, reserving the mushroom water.
To make the cauliflower rice, place the cauliflower in the bowl of a food processor and pulse into tiny, fine pieces that look like rice. Melt 1 tablespoon of the oil or fat in a saucepan over medium–high heat. Add the sliced mushrooms and sauté for 2 mins, season with salt and pepper and remove from the pan. Wipe the pan clean, add the remaining coconut oil or fat and the onion and sauté for 5 mins until the onion is translucent.
Stir in the garlic, thyme and reserved porcini mushrooms and sauté for 30 secs. Pour in the wine and cook until completely reduced, 5–10 mins.
Add the cauliflower rice, broth or stock and reserved mushroom water to the pan, return the mushrooms and cook, stirring occasionally, for 5–7 mins until the cauliflower rice is cooked through. Remove from the heat, stir in the lemon juice and parsley and season with salt and pepper.
To finish, divide the risotto between four serving plates, scatter over the chestnuts and extra parsley and drizzle with the truffle or extra-virgin olive oil.
Note: To prepare the chestnuts, score the top and bottom of each one with a knife and place on a baking tray. Roast in an oven preheated to 180°C for 10–12 mins until the skins split. Transfer to a small bowl, cover with plastic wrap and set aside for 10 mins to steam. Peel away the hard outer layer and discard. Finely slice the chestnuts, transfer to a greased baking tray, drizzle over a little olive oil and toast in the oven at 180°C for 5–6 mins until golden. Season with a little salt.

BROCCOLI & SESAME SALAD
Serves: 4–6
200g broccoli, broken into florets, stems reserved
1 bunch (about 180g) broccolini
2 spring onions, thinly sliced
2 handfuls rocket
1 small handful mint leaves, torn
80g (½ cup) almonds (activated if possible), toasted & chopped
2 tbsp. olive oil
1 tsp sesame seeds, toasted
Dressing
65g (¼cup) hulled tahini
3 tbsp. apple-cider vinegar
1 garlic clove, finely chopped
Sea salt & freshly ground black pepper
To make the dressing, combine the tahini, vinegar and garlic with 3 tablespoons of water in a bowl. Season with salt and pepper and mix well.
Thinly slice the broccoli stems lengthways using a mandolin, or peel thinly with a vegetable peeler, and place in a bowl. Slice the broccolini lengthways, chop into 2cm pieces and combine with the sliced broccoli stems.
Add the broccoli florets, spring onion, rocket, mint and half the almonds. Pour on the olive oil, season with salt and pepper and gently toss to combine.
Arrange the salad in a serving bowl, drizzle on the dressing and sprinkle over the remaining almonds and the sesame seeds.
Tip: Serve with some fermented veg tossed through the salad.

CULTURED GREEN PAPAYA
Makes: a 1.5L jar
2 green papayas (about 800g each), peeled & deseeded
3 tsp sea salt
1 long red chilli, deseeded & finely chopped
1½ tbsp. finely grated ginger
2 tbsp. finely chopped coriander
2 tbsp. lime juice
1 small cabbage leaf, washed
You will need a 1.5-litre preserving jar with an airlock lid for this recipe. Wash the jar and all the utensils you will be using in very hot water or run them through a hot rinse cycle in the dishwasher.
Shred the papaya in a food processor with a grater attachment, or grate by hand, then place in a large glass or stainless steel bowl. Sprinkle over the salt, chilli, ginger, coriander and lime juice.
Mix well and massage with your hands for 5 mins to release some liquid.
Fill the prepared jar with the papaya mixture, pressing down well with a large spoon or potato masher to remove any air pockets. Pour in all the liquid from the bowl and leave 2cm of room free at the top. The papaya should be completely submerged in the liquid; add some filtered water if necessary.
Take the cabbage leaf, fold it up and place it on top of the papaya mix, then add a small glass weight (a shot glass is ideal) to keep everything submerged. Close the lid, then wrap a tea towel around the side of the jar to block out the light. Store in a dark place with a temperature of 16–23°C for 5–7 days. (Place the jar in a cooler to maintain a more consistent temperature.)
Different vegies have different culturing times and the warmer it is the shorter the time needed. The longer you leave the jar, the higher the level of good bacteria and the tangier the flavour. Chill before eating.
Note: Once opened, the cultured papaya will last for up to two months in the fridge when kept submerged in the liquid. Unopened, it will keep for up to nine months in the fridge.

Sorry, the comment form is closed at this time.